The intricate game, titled Elden Ring: Nightreign, might pose a challenge for both novice and seasoned players of Elden Ring. This swift-moving game requires consistent focus, and if you’re unsure about the best spots to explore or what to prioritize in each instance, navigating Nightreign could prove challenging as you strive to build enough strength to confront each Nightlord.
To determine the most effective strategy for each adventure in Elden Ring Nightreign, use this guide to discover the ideal path, which will help you understand what needs priority on Day 1, where your focus should be during Day 2, and other suggestions to help you grow stronger rapidly, reaching a powerful position by Day 3.
Optimal Day One Route In Elden Ring Nightreign
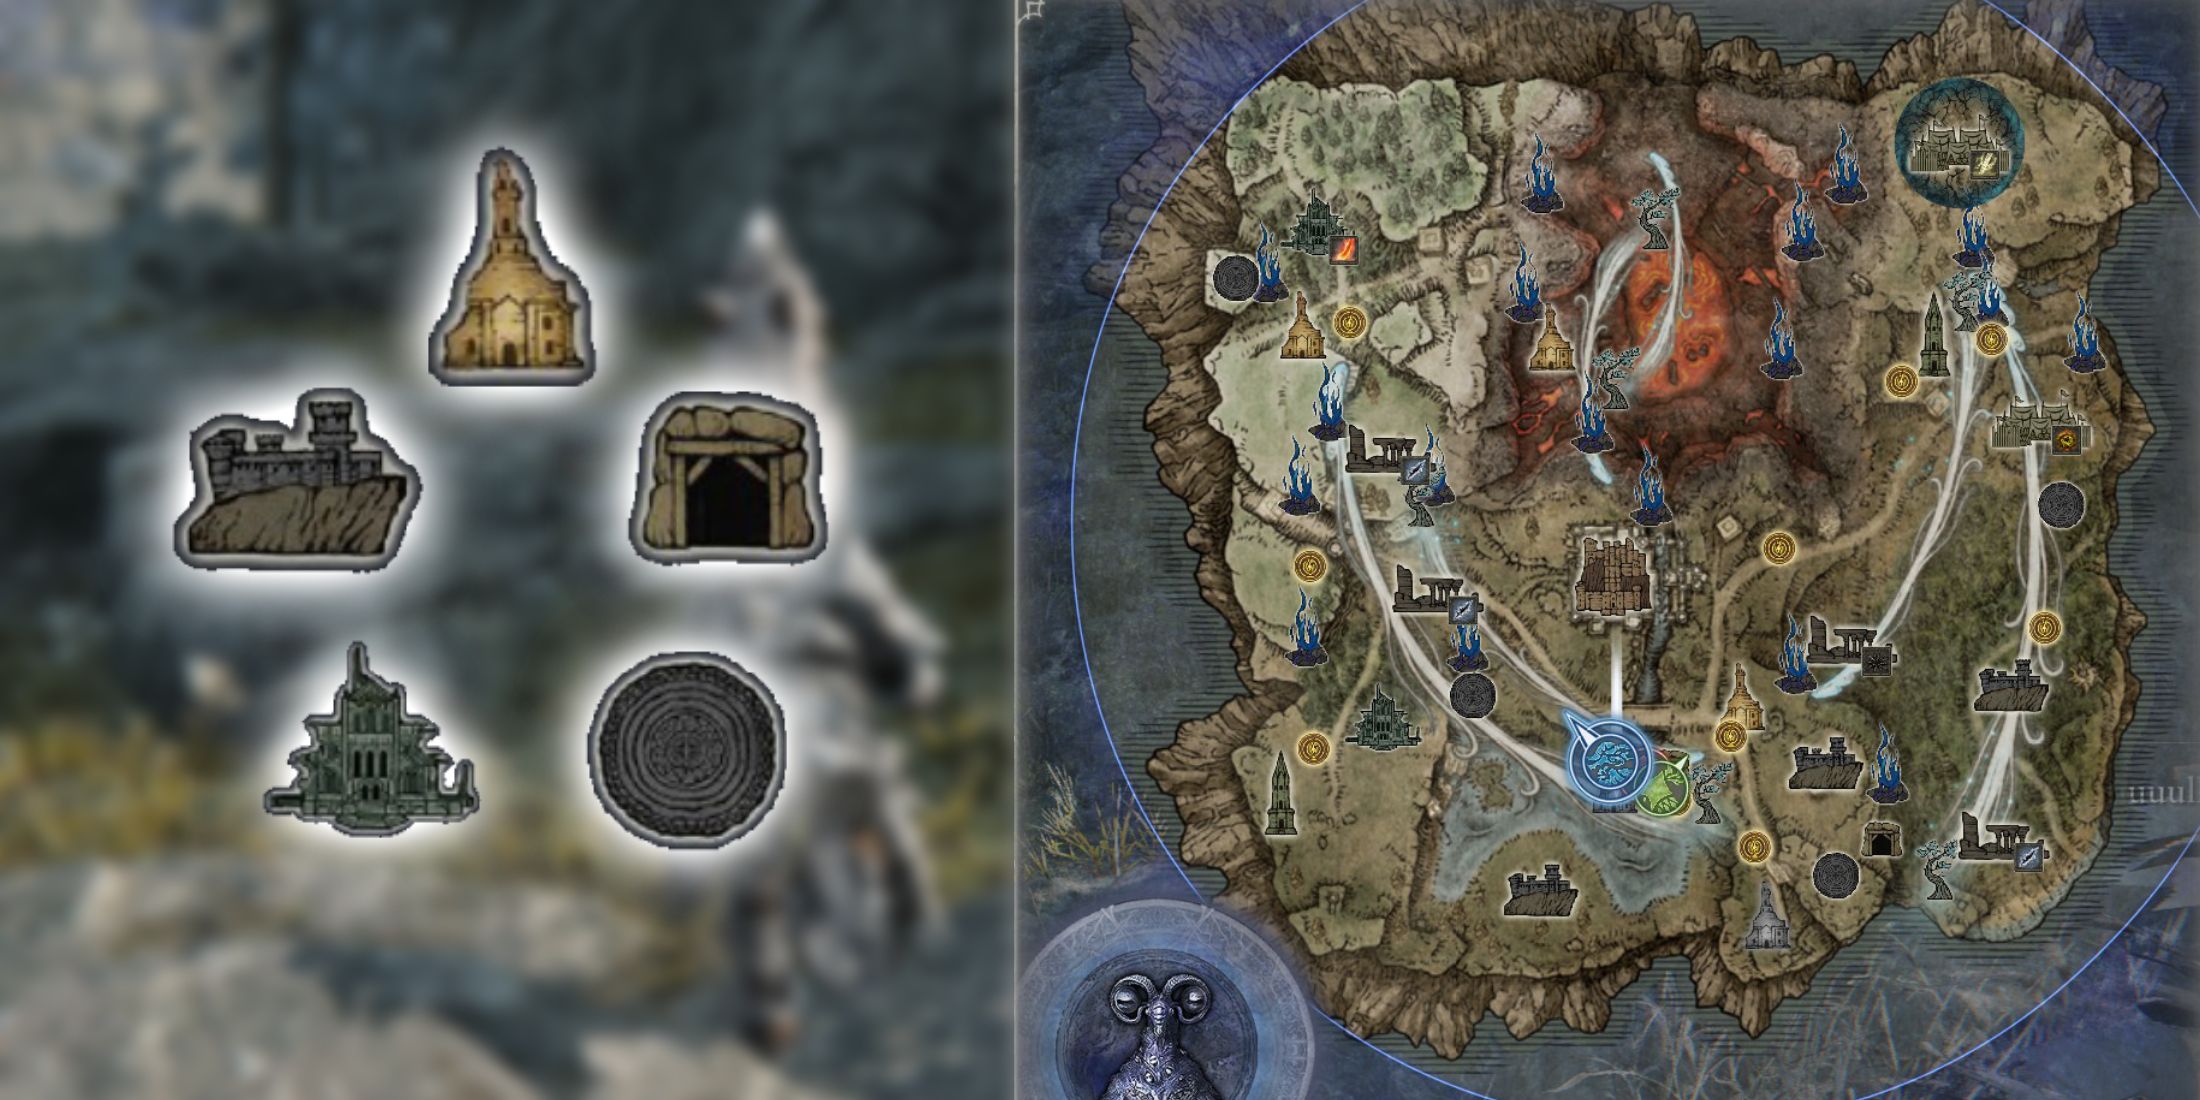
First Things First, Identify Your Route Via Boss Weakness POIs & Church Locations
Upon reaching Limveld, take a moment to unfold your map and locate all church sites and notable landmarks that offer weapons specifically designed to harm your target, the Nightlord. While it isn’t essential to hit these spots during your first day, keep in mind their whereabouts should you need to make a swift journey there on the second day if necessary.
Upon touching down, make sure to have a clear idea of your initial destination. Aim to head towards the nearest church and pass by significant landmarks on your journey, focusing particularly on areas with manageable bosses suitable for lower level characters.
Rush Level 2, Then Look For Caves, Great Churches, & Forts As You Get Sacred Flasks
Generally, upon arrival, you’ll be situated near an encampment or a band of adversaries. In any mission, the initial action should be to eliminate this group swiftly to gather sufficient Runes for Level 2, following which you can proceed towards your primary destination – ideally a Church.
In particular, keep an eye out for these easy early locations in Nightreign:
- Great Churches, which usually have a Golem, Oracles, or Fire Monk boss, depending on the affinity associated with the location. All of these bosses are easy to kill at Level 2.
- Forts, which will typically house an Abductor Virgin, a Lordsworn Captain, an Archer Golem, or Crystalians as the location boss. Once again, these are surprisingly easy to kill in early levels.
- Caves, which always have a Giant at the end that rewards a choice between a normal boss reward or a Smithing Stone +2, something you should try to acquire in most runs.
Around levels 5 or 6, it’s a good idea to also explore and conquer Camps and Ruins, aside from the places already mentioned. This will provide you with more opportunities to gather Runes as the outer circle of possibilities begins to narrow.
At both Camps and Ruins, you’ll find challenging, multi-stage battles against bosses that may require considerable effort and patience to defeat. However, the experience points (XP) you earn from these locations are typically substantial, making them worth the investment of time. Additionally, both areas offer a plethora of chests for you to open, which can yield additional equipment.
Before The End Of Day 1, Try To Reach Level 6 or 7
Ideally, you should aim to reach Level 6 by the end of Day 1. This will give you a good chance of reaching Level 7 by Day 2. Once the second ring closes, locate the final ring’s position on your map and head towards it. As you encounter ordinary enemy groups along the way, take them out to collect some additional Runes before returning.
If you’re comfortable handling supervisors, seek out some excellent initial spots en route to the final circle. Being near the final circle means you’ll have extra time to battle the bosses there and grab a piece of bonus Runes before Day 1 starts.
Optimal Day Two Route In Elden Ring Nightreign
Finish Collecting Sacred Flasks & Prioritize Boss Weakness Locations
Once you conquer the initial Night Boss, Day 2 commences, darkness recedes, and you’ll have the chance to venture back into Limveld for additional levels and gear acquisition. Immediately after the magical ring vanishes from sight, make a swift dash to your next destination using Surge Sprint.
At the beginning of Day 2, it’s important to prioritize these locations:
- Boss weakness points of interest, if you didn’t get to any on Day 1. This should be your main priority, and is especially important for locations that are on the edge of the map.
- If you don’t reach boss weakness locations by the time the first ring closes, and if they aren’t contained in the safe zone for the first ring, you will have to hope a boss weakness weapon drops from other sources.
- Any remaining Churches, which will increase your Sacred Flasks to a total of at least 6 (and sometimes up to 8 or 9, depending on how many spawn).
- Aim to get at least 6 Sacred Flask charges in a run, which will improve to 7 uses after you defeat the Night 2 boss. It’s nice to have more, but if a Church is far out of your way and you already have 6 charges, there’s no reason to waste time traveling to it.
Based on the distribution of these high-priority spots, feel free to engage in any Evergaols (provided you possess a Stonesword Key), or tackle unidentified Field Bosses along your journey. Remember not to linger too long at one boss to avoid wasting excessive time. If you’re dealing minimal damage to a boss, it’s wiser to retreat than risk a potential level drop.
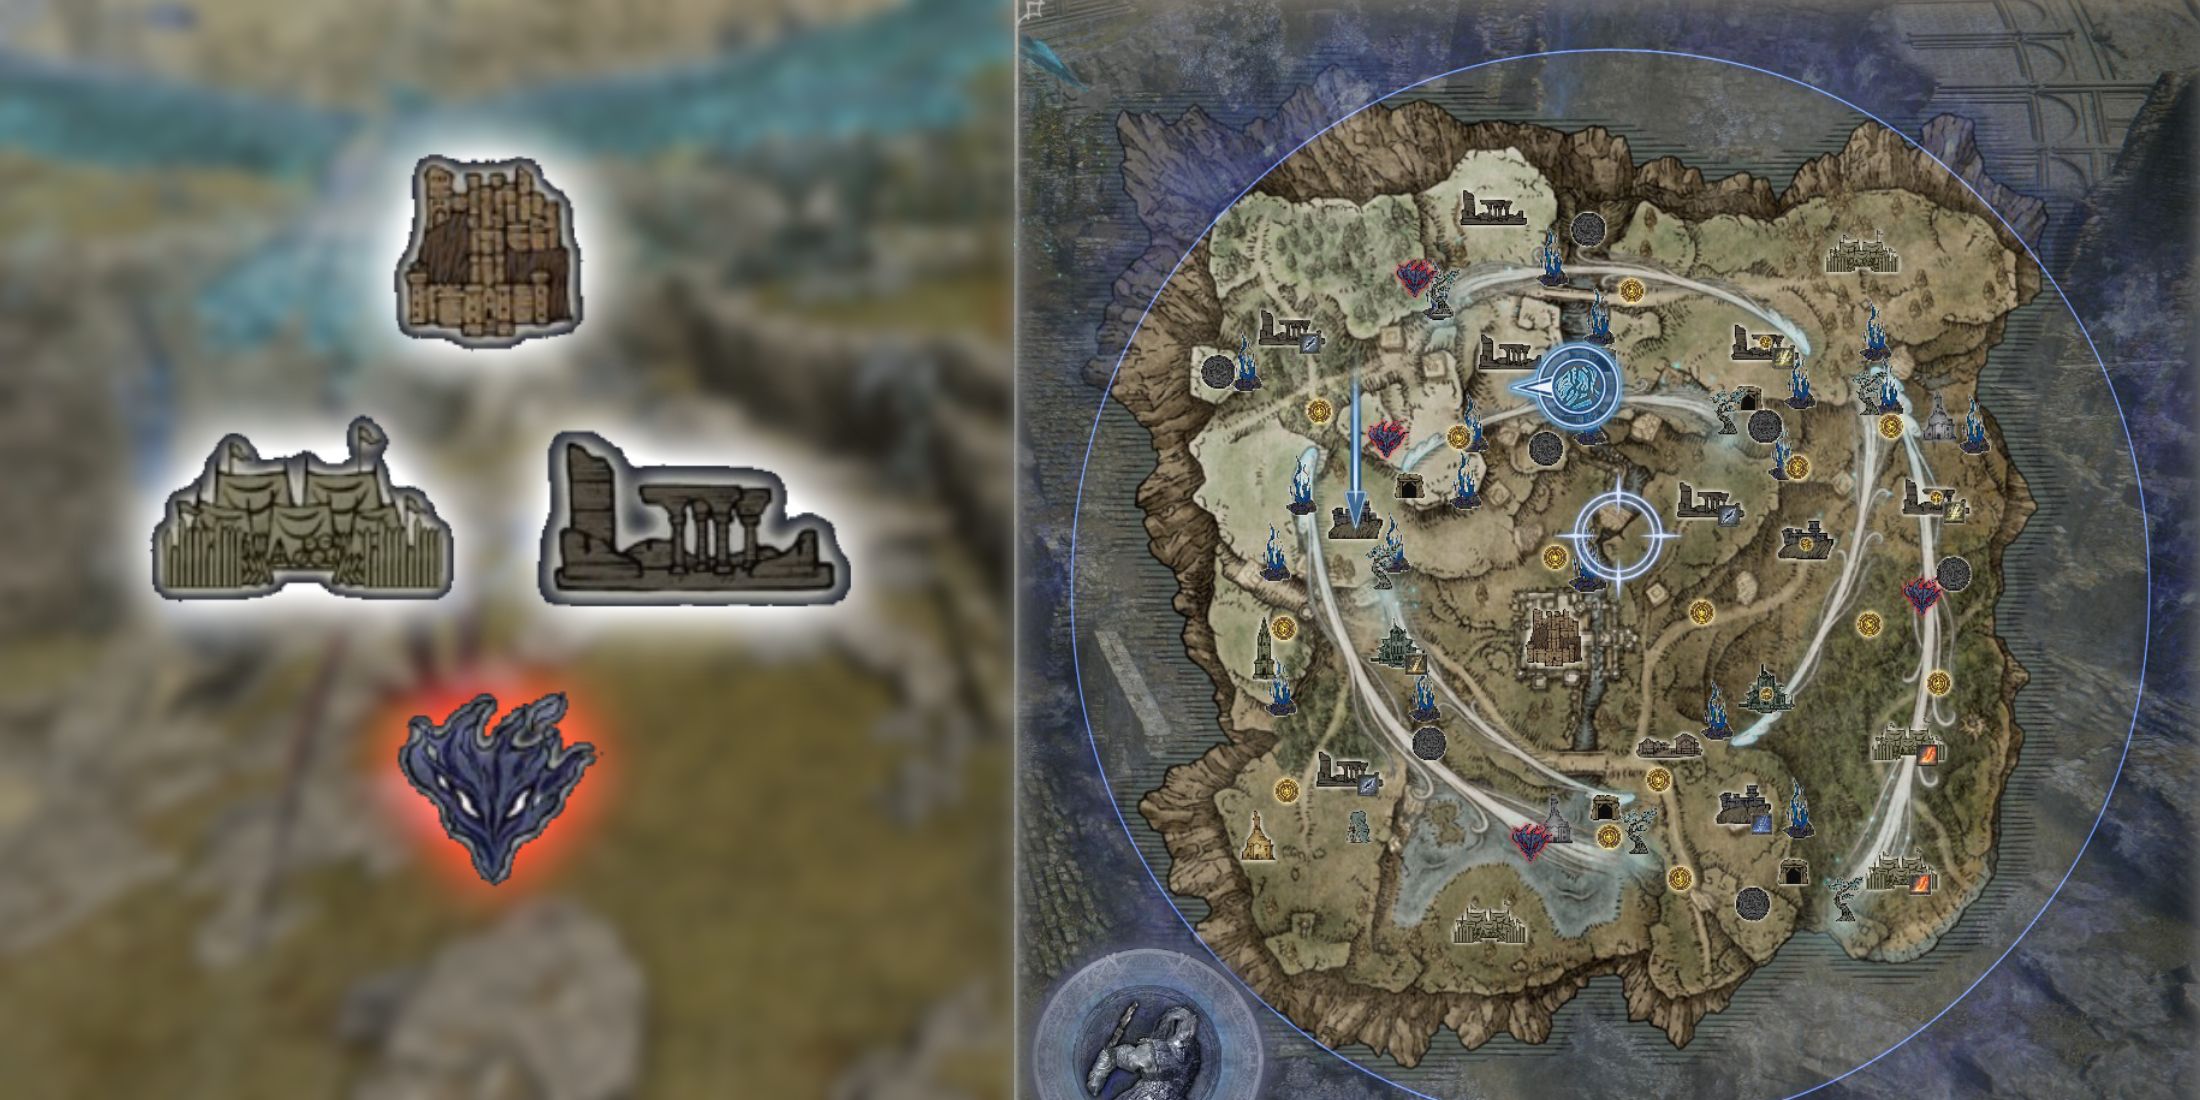
Go To The Castle At Around Level 8 or 9 For High XP Gains
As you reach Level 9, it’s beneficial to make your way towards the Castle. This becomes particularly important if the Ring encompasses the Castle within its secure area. Although the Castle’s position remains constant, the tougher foes within it are not static.
As you progress through the game, you might encounter Banished Knights, Crucible Knights, giants hurling magical explosive pots, Golems, and other challenging foes stationed on the fortifications. By Level 9, you should be capable of handling these enemy types effectively, especially if your team works together harmoniously.
As a gamer, I’ve noticed that the tougher the foe I take down, the juicier the Rune reward. The puny Golems barely drop any, but Crucible Knights and Giants are real treasure troves – each kill nets you an impressive 18,000 Runes! So, if you’ve got some spare time on your hands, farming these high-level enemies for Runes is a great way to level up, aiming for about level 10 or 11.
Rush Field Bosses In The Second Day 2 Ring To Get To Level 11 or 12
Once the initial circle is completed and you’ve had ample time cultivating Runes within the Castle, you should accumulate sufficient power and robust equipment, including passive abilities gained from defeating bosses and opening chests, making it appropriate for you to focus solely on hunting Field Bosses.
As a gamer, I’ve noticed that some Field Bosses can be downright challenging compared to others. Particularly, the Nightreign bosses pose a significant threat. I wouldn’t recommend taking them on unless you’re absolutely certain of your gaming prowess.
Starting from Day 2 on your map, you’ll find the locations of the Field Bosses denoted by the shiny, reddish-glowing purple icons that resemble a demon’s face. Remember to check these out carefully as you approach them, ensuring your team has the ability to defeat each one.
Generally speaking, Valiant Gargoyles are the toughest Field Bosses to conquer due to their massive health reserves and potent, swift assaults. Similarly, Death Rite Birds pose a significant challenge as they possess multiple Ghostflame abilities that can swiftly annihilate any Nightfarer.
In simple terms, almost all Field Bosses can be defeated by any team, providing ample Runes and superior rewards from high-level bosses upon success. If you play strategically, you should progress to at least Level 12 after engaging with one or two Field Bosses.
The Shifting Earth Caveat
Shifting Earth Events Are Almost Always Worth Trying On Day 2
In the game Nightreign, there are four occurrences of Earth Shifts, and it’s beneficial to complete these events, with the exception of the Mountaintop event, at some stage during your gaming session.
In case of a Shifting Earth scenario, the last circle on Day 2 will always materialize within the affected region. Therefore, it would be prudent to begin moving towards this area as soon as the initial circle begins to contract, giving you ample time to accomplish each task.
As a gamer, I always make sure not to miss out on the thrill of each Shifting Earth event, as they’re teeming with tough Field Bosses and high-level foes that shower me with Runes – making them a great spot for leveling up. Out of the four events, three are definitely worth chasing after during every expedition due to their valuable rewards.
- The Crater, which features a smithing table deep below the earth that can upgrade any armament to Legendary quality and remove its level requirement
- The Rotted Woods, which grants Scarlet Rot immunity for the rest of your stay in the woods, as well as an HP boost and the ability to recover lost HP if you attack quickly after being hit. You must activate a nearby Fort first to find the location of this power
- Noklateo, the Shrouded City, which will reward you with the ability to come back from Defeat once if you can find the way to the inner temple and defeat the Astel boss guarding this power
Significantly, reaching the base of The Crater on Day 1 grants you the unique ability to wield a weapon that usually requires higher levels. So, if you stumble upon a potent weapon early in your journey, it might be wise to focus your efforts on exploring The Crater first.
As I navigate my journey, I seize opportunities to collect simple Runes by leaping onto the Flame Charriots and striking their vulnerable points. This swift blow instantly annihilates these enemies, regardless of level, offering a quick win in my favor.
In this particular exploration, the Nightlord of the Misty Chasm cannot be encountered directly. However, if you manage to ascend the mountainous terrain, you’ll discover a way to challenge and potentially defeat it.
The creature named Caligo inflicts Frostbite damage. Having the Mountaintop ability increases your attack power when Frostbite affects nearby enemies, and it also decreases the rate at which Frostbite accumulates by half. If you’re aiming for Caligo and have the Mountaintop Shifting Earth event activated, prioritizing the Mountaintop’s power after the first day’s ring closure should be a key focus for you.
Read More
- Binance Unveils Binance Alpha for Early-Stage Crypto Projects
- Shiba Inu Sees Bullish Reversal In On-Chain Metrics, Can SHIB Price Recover?
- Connections Help, Hints & Clues for Today, March 1
- What Is Dunkin Donuts Halloween Munchkins Bucket?
- The games you need to play to prepare for Elden Ring: Nightreign
- Paul McCartney Net Worth 2024: How Much Money Does He Make?
- BUZZ: Rajinikanth starrer Jailer 2 directed by Nelson Dilipkumar likely to go on floors from March 2025
- What Does Mickey 17’s Nightmare Mean? Dream Explained
- Sitara Ghattamaneni: The 12-Year-Old Fashionista Taking the Spotlight by Storm!
- The Babadook Theatrical Rerelease Date Set in New Trailer
2025-06-02 23:44